Reactor~Reactor
Game Overview: Points, Strategy, and some Luck
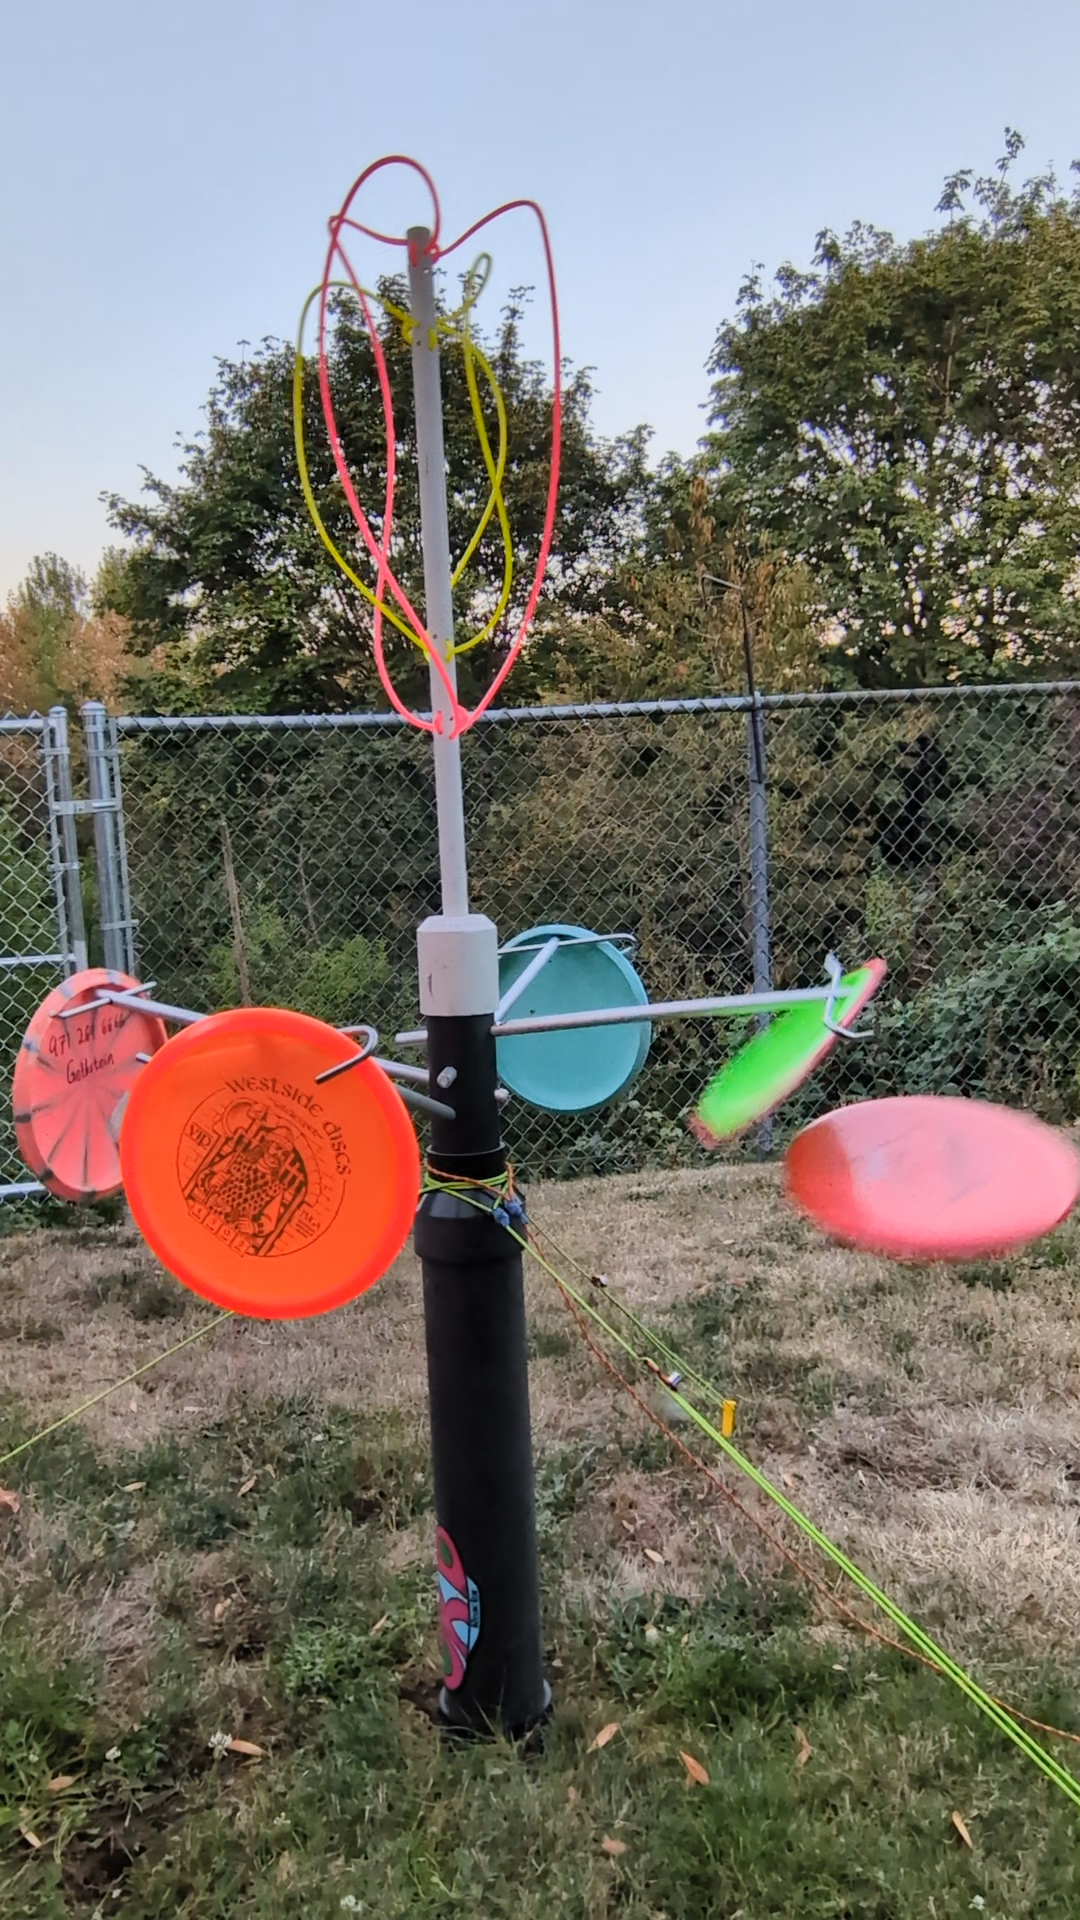
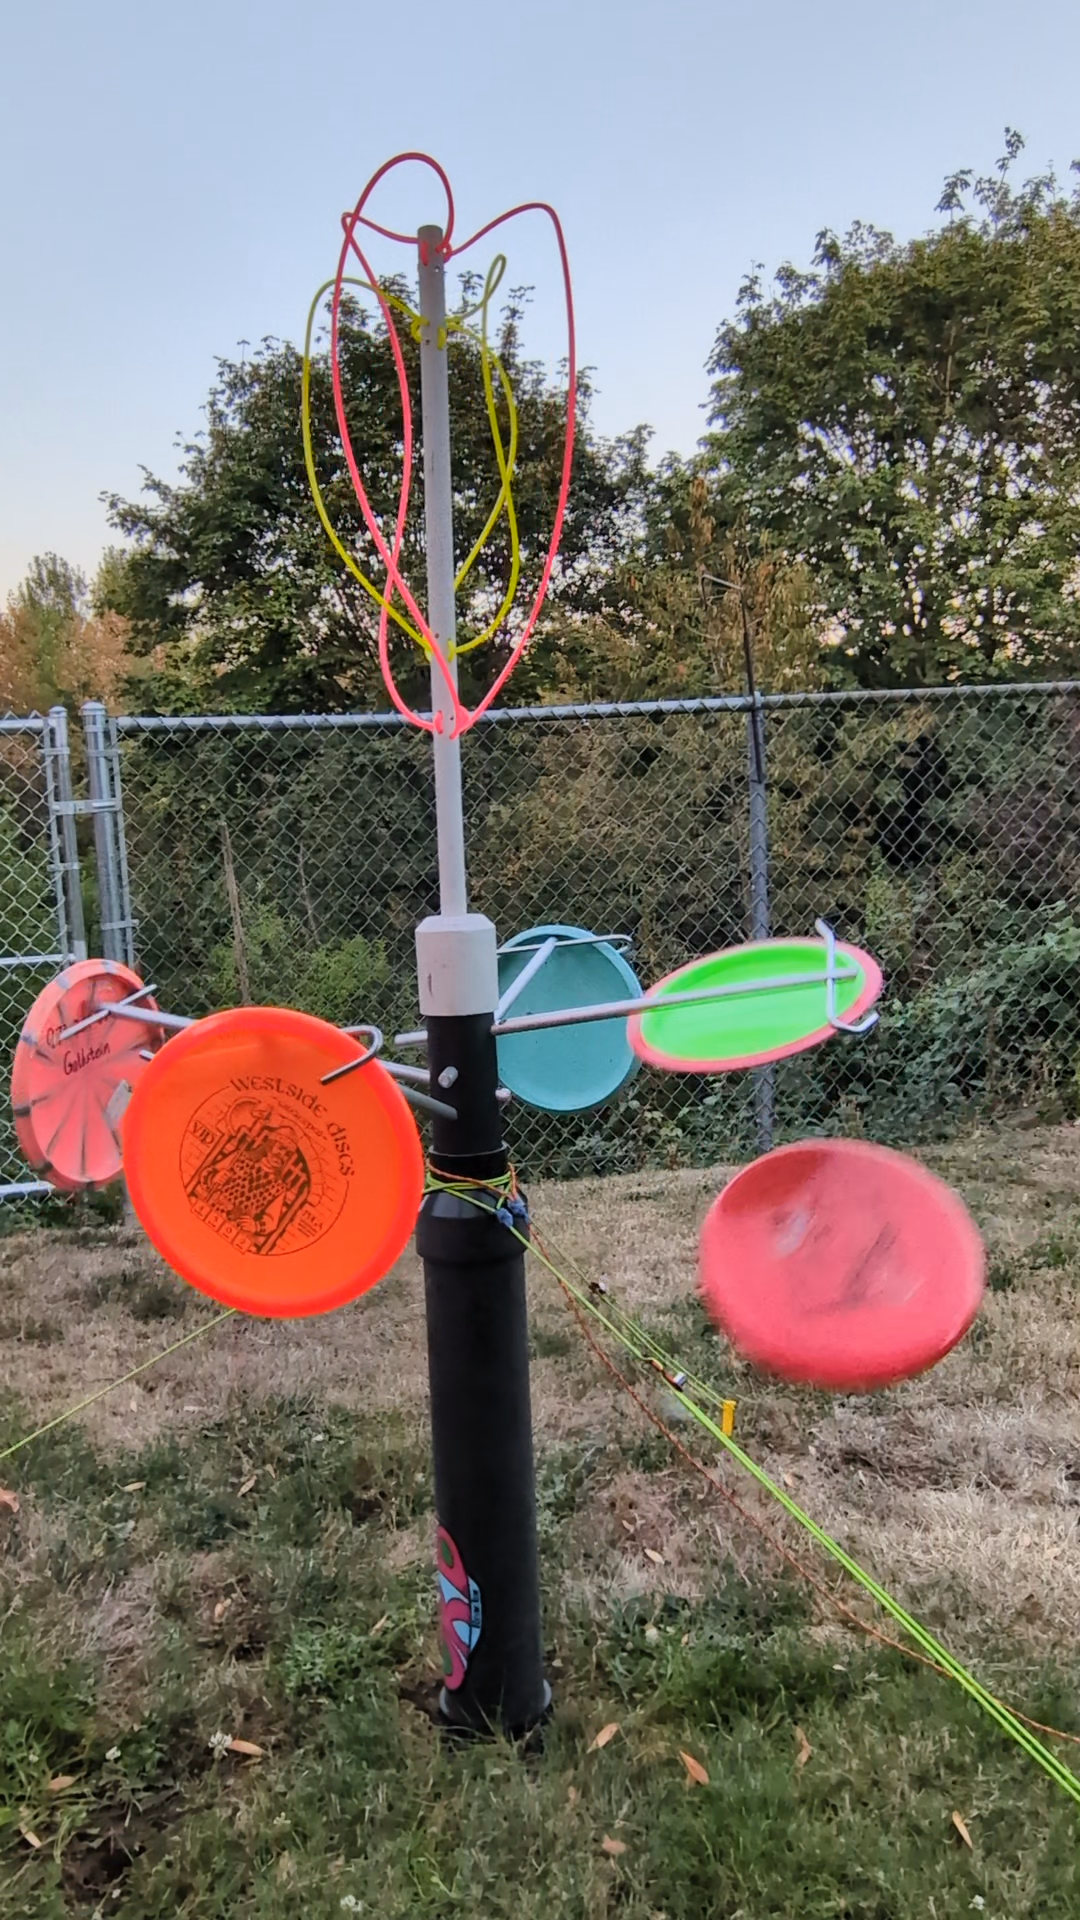
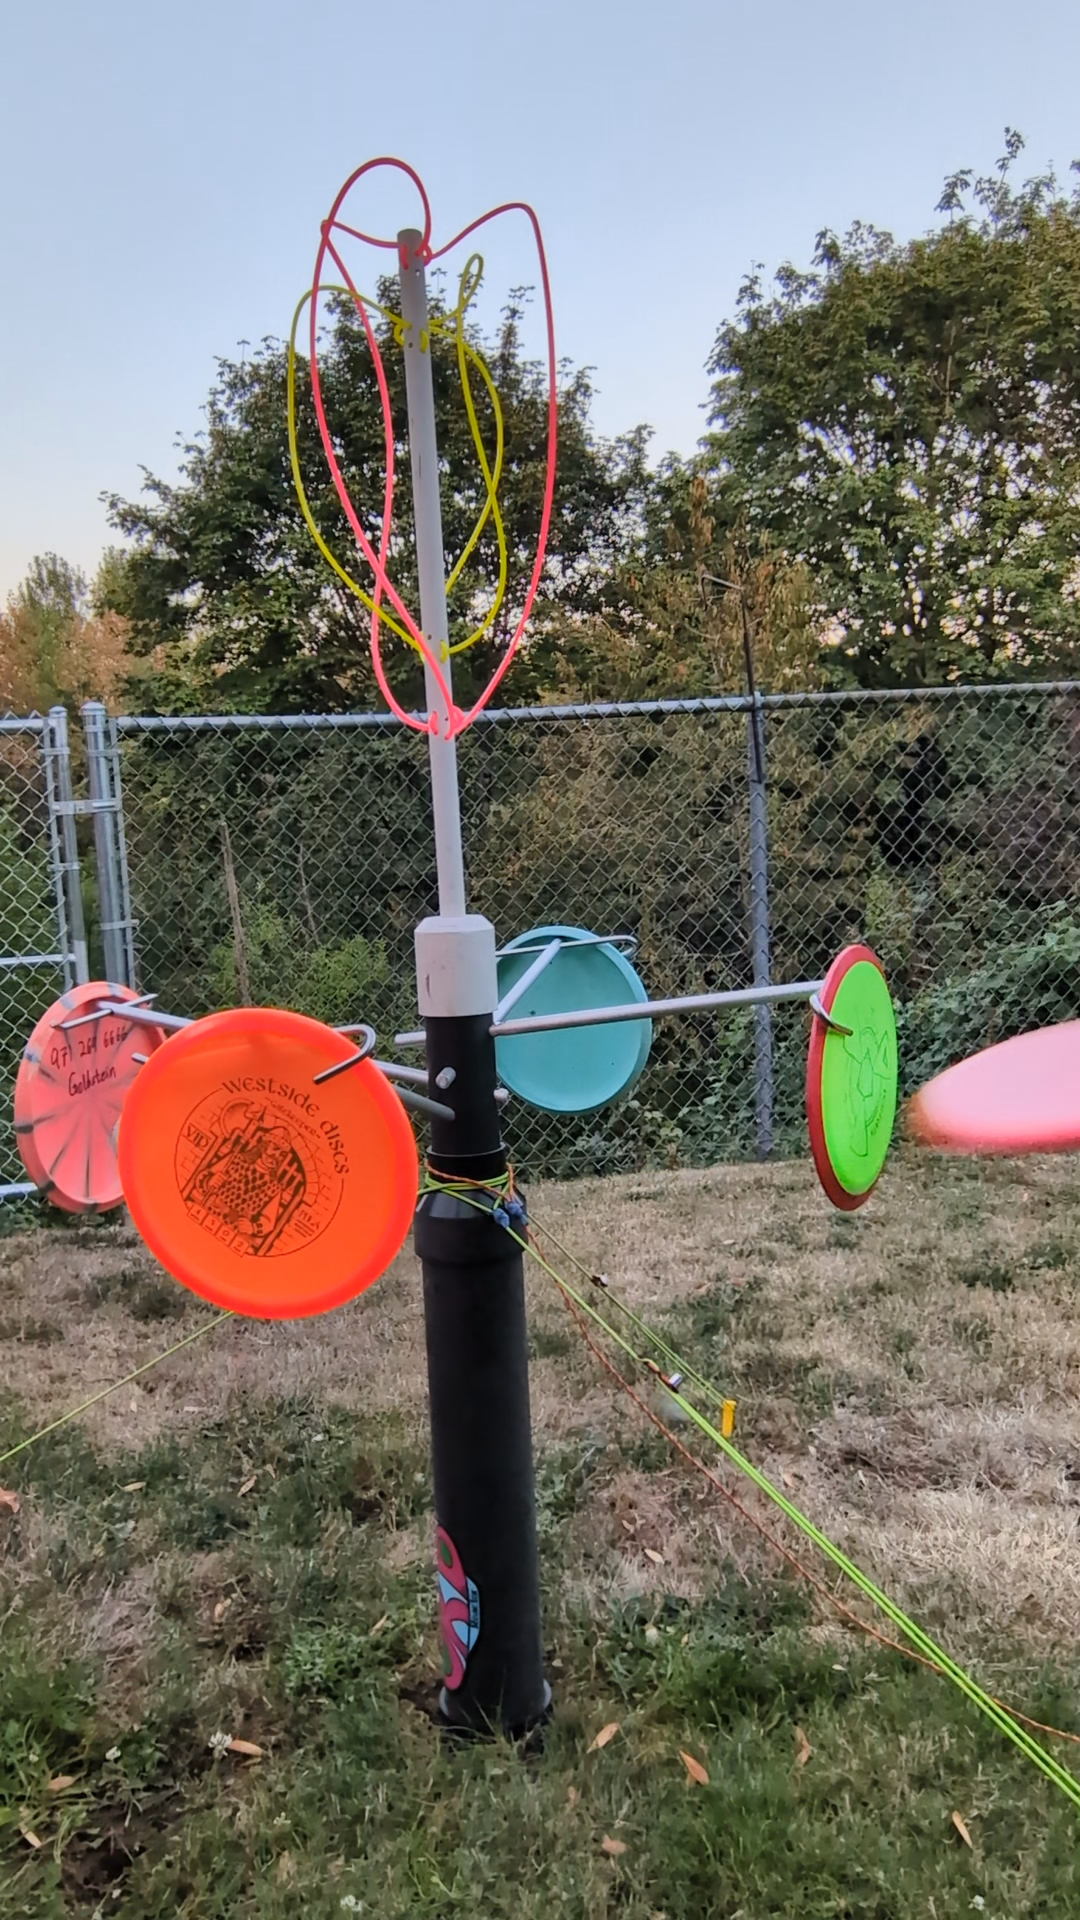
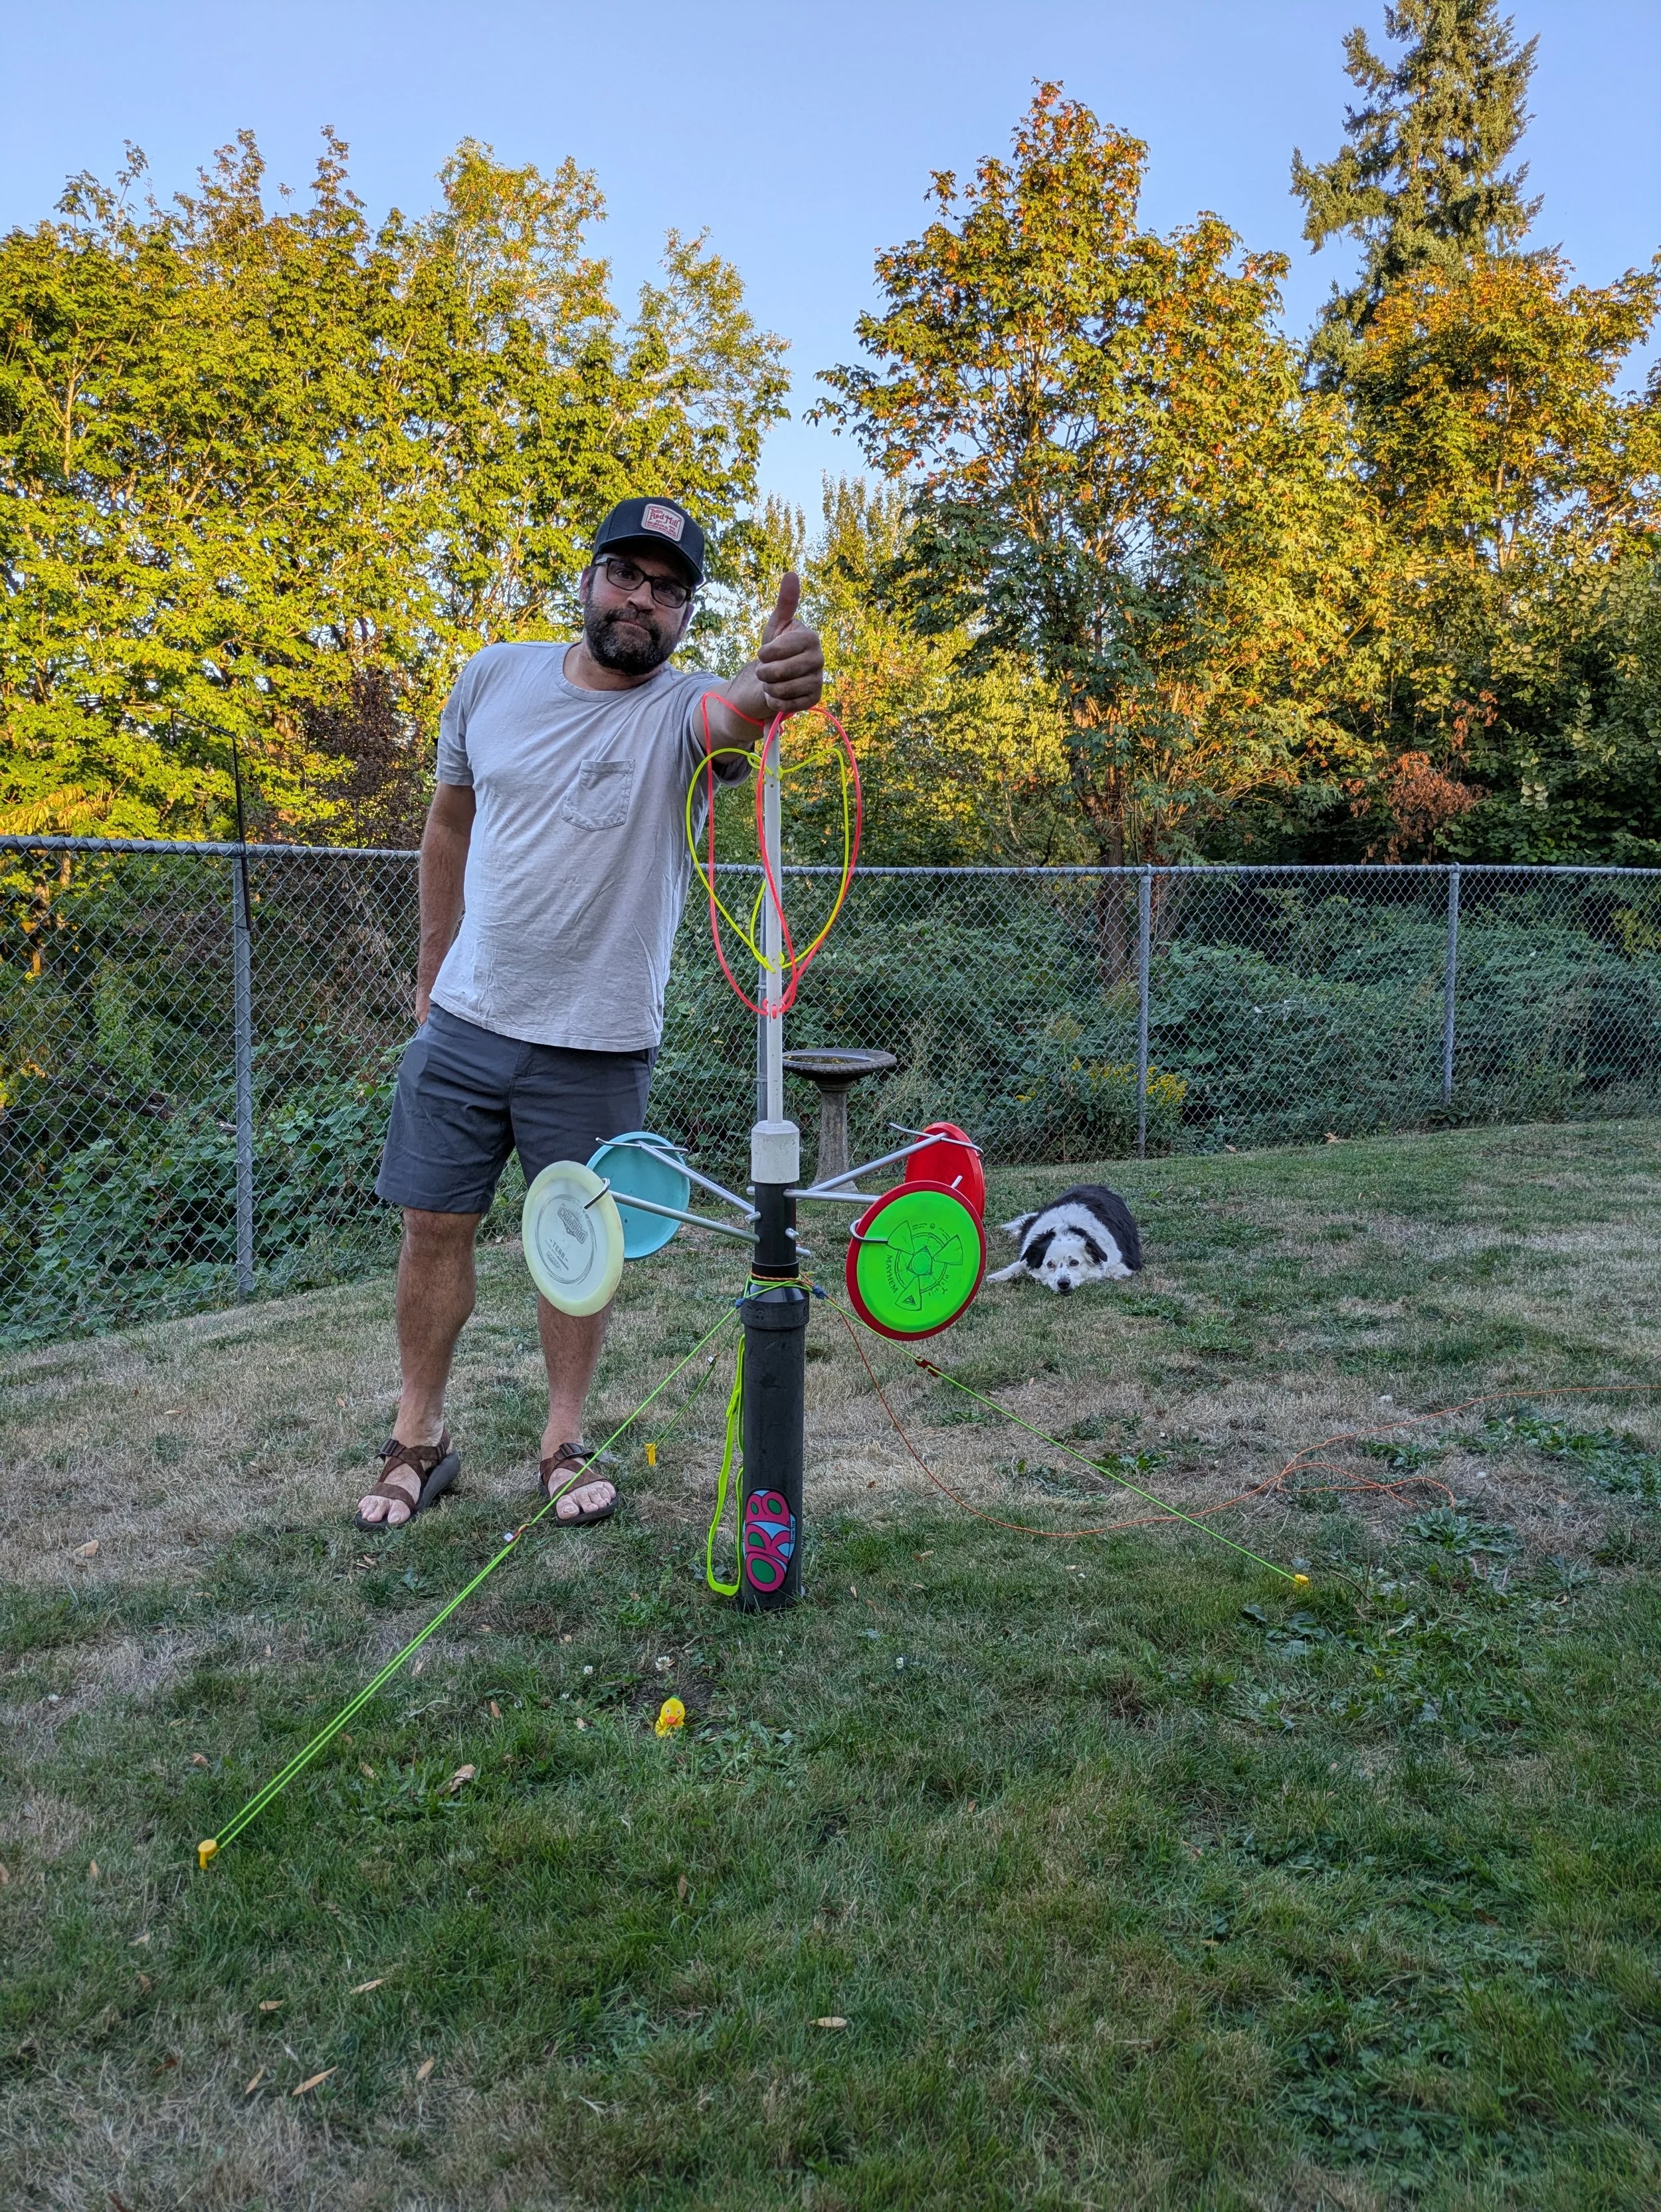
Unlike traditional disc golf, Reactor~Reactor is all about scoring as many points as possible. While it shares similarities with disc golf in terminology, the game introduces a fresh scoring system where hitting the target is just the beginning. The Orb Reactor is a hitting target – there's no basket, adding a unique challenge to every throw.
One of the most exciting aspects of Reactor~Reactor is the freedom to be your own course designer! You get to establish the fairways and drive distances, unleashing your creativity to craft unique and engaging courses in any open space.
The game is a dynamic blend of skill, strategy, and a touch of luck. You'll encounter a variety of scoring opportunities and a few penalties that keep every round exciting. Putting is key, and Reactor~Reactor gives you three putt shots per "par" opportunity, compared to just one in traditional disc golf, offering more chances to score big and refine your short game.
A critical element is the upper portion of the orb compared to the lower portion. Hitting the upper portion offers safe scoring, while hitting below can lead to penalties and unpredictable outcomes – that's where the "luck from the Orb Reactor" comes into play!
Whether you're looking to seriously dial in your putting skills or engage in a competitive game that challenges both your accuracy and tactical thinking, Reactor~Reactor provides an incredibly versatile and enjoyable experience.
Reactor~Reactor Gameplay
In Reactor~Reactor, the gameplay revolves around the dramatic "reaction" that occurs when your disc makes contact with the entire ORB reactor unit. The position and force of your disc's impact on the ORB determine the resulting kinetic REACTION. This reaction can send other discs flying, potentially earning you points for knocking them off or incurring penalties depending on where and how you hit the Orb. This is where a significant element of luck comes into play, creating moments of both triumphant "good reactions" and frustrating "bad reactions" that define the Reactor~Reactor experience.
To play this game safely and effectively, you'll need a spacious, wide-open field, such as a soccer or baseball field. These locations offer ample distance for throws and provide a safe environment for all participants. Always remain mindful of your surroundings, ensuring that you do not endanger people, pets, or other obstacles while playing.
Unlike traditional golf or disc golf, where the objective is to achieve the lowest possible score, the primary goal of this game is to accumulate the highest point totals. Players also enjoy a more forgiving scoring system, receiving three bonus putts per round instead of the single attempt typically allowed in regular disc golf. With these exciting rules in mind, let’s get started!
Finding and setting up the field with a single Orb:
***Variations can be made with multiple Orbs. Like throwing back and forth between other Orb setups.
Course Design: You establish the fairways and drive distances. This is where your creativity shines! Define "tee pads," set par distances (referencing PDGA rules if you like), and even incorporate "mandos" (mandatory routes) and "out of bounds" areas like roadways or paths for added challenge. Obstacles can be included like going around a tree. (Man made bunkers as well: See bunker rules*)
Landing Zone (LZ): When setting up a single ORB, position it in a central, accessible location to allow for diverse approach angles from various tee pads. If you have multiple units, feel free to design a custom course as you see fit. For a standard match using a single ORB, establish three or six tee positions spaced at intervals of 60 to 120 degrees to ensure a dynamic, rotating field of play; you can play multiple matches to extend the game's duration.
A couple side notes about the landing zone: Remember that the landing zone shrinks for every throw over par: while the initial landing zone is larger, it decreases to a 20-foot radius for a bogey and to just 10 feet for a double bogey or worse.
Advanced players can even call for a smaller Landing zone being the 20 or 10 foot radius. Default is always the 30 foot marker unless declared by players before the round starts.
Overarching Objective:
Hit the Orb that is in the landing zone (LZ) with caution!!!
From the “tee pad” spot you have chosen, your primary objective is to land or roll your drive into the designated landing zone to stay on par—or better yet, strike the Orb! It is crucial to prevent your discs from rolling out of this area, as missing the landing zone costs you potential points and requires you to redeem yourself with bogeys to maintain a competitive score.
Understanding the fairways: You must determine what the par is for your “fairway” and the T-pad location. For example a 300 yard distance should only take the average player 1 distance drive to get into the landing zone so therefore it is a PAR 1 round of play. PAR 2 would be a further distance and so forth for any longer fairways. If you need to throw around a tree, or any other obstacle then that can be considered into the equation as well. This option is fun for smaller fields and thus you can create a zig-zag course layout. (Plus see the option for setting a bunker* obstacle.)
Getting your discs to stay in the landing zone on par earns you a LZ shot plus 3 bonus putts. Birdie drives or better will earn you a LZ shot and add to your bonus putts by one putt each drive under par. You then can maximize your score by throwing bonus putts from your designated putt spot location, which is marked using the measurement rope. Bogey shots will result in losing your LZ shot and more bonus putts.
New terminology otherwise known as ORBonics :):):)
To understand scoring in this game, we will examine the terminology associated with the ORB. We can also connect these new terms to familiar golf references—specifically pars, birdies, and bogeys—to clarify the scoring structure for your drive shots and then bonus putts.
The landing zone rope (LZ): The rope used to measure the area you need to land in to be safe. The size of the landing zone decreases when you go over par. Use the rope provided to help with measurements. It measures approximately 30 feet, making the Landing zone a 60 foot target to start.
LZ shot: This is where your initial drive came to rest in the landing zone. If you did this on par then you are rewarded this putt/shot too.
Bonus Putts: Earn these by getting in the designated landing zone. Players start with a "Par" baseline of 3 putts per round. Birdies award additional putts, while double bogeys result in a deduction.
Putting spot location: This is where you want to practice your putting distances from. The measurement rope provided is divided into 3 marker spots giving you 3 options for putting spots. (Professionals can add a rope for further putting distances) Note that these markers can also help define the landing zone size as well for your drive shot. *Kids and newbies can make their own putting spots and drives for that matter.
Orb points: An Orb shot occurs when a drive or putt successfully strikes the upper post or makes any contact with the reactor strings—even a slight brush that causes minimal movement qualifies as a valid hit.
Skilled 2: A precise maneuver where you target a specific disc, earning exactly two points by knocking only that disc loose. Usually pretty close to the Orb on your LZ shot.
Sloppy 2: This is when you somehow made one disc fall by itself without hitting the upper orb portion and yes even the guy lines count. Slop with good luck behind it for this example.
Lucky 3-Point Shot: A high-value play where your disc hits the ORB and triggers a good reaction that results in only one disc falling, with all others remaining intact.
Slop Shot: This occurs when a drive or putt strikes below the upper post (red line), triggering a reaction that knocks more than two discs off the reactor rods. No points rewarded for that putt.
Kill Shot: The ultimate penalty for a reckless bonus putt. This occurs when a "sloppy" impact causes all remaining discs to fall at once. Executing a kill shot wipes out any points previously earned during that round, though you may use your remaining putts to try and salvage a few points. Play carefully to avoid this costly mistake!
Drive shots and the potential
The drive shot is your initial throw from the tee pad. These are only single disc throws.
Par or Better Drive (within 30ft LZ*):
Goal: Land and have your disc come to rest within the 30-foot LZ on par or better.
Reward: Earn a LZ shot (throwing from where your disc landed) and 3 bonus putts.
Birdie/Under Par: Earn 1 additional bonus putt for every drive under par.
Bogey Drive (within 20ft LZ):
Goal: Land your disc to rest within the 20-foot LZ. Or make a hit and stay in the LZ.
Reward: Earn 2 bonus putts but no LZ shot.
Only orb points (1-3) count so no sloppy 2
Double Bogey Drive (within 10ft LZ):
Goal: Land your disc to rest within the 10-foot LZ. Or make a hit and stay in the LZ.
Reward: Earn 1 bonus putts but no LZ shot
Only orb points (1-3) count so no sloppy 2
Triple Bogey Drive (within 10ft LZ):
Goal: Just try to hit the Orb and get lucky. No sloppy 2s
Reward: Only orb points (1-3) count so no sloppy 2
Out of Luck: If the disc doesn't land in the required LZ, the round is over for that player.
*If you super awesome and hit the ORB on a drive shot before par then you get bonus points as follows.
For every disc that falls past a single will add 1 point each plus 3. (Lucky 3 plus other singles) This includes slop shots too since it was so far away. So a possible total of 6 points.
You can not roll your driver disc and score points but a bounce will count.
The driver disc must still come to rest in the landing zone.
Bonus putts with points and penalties:
ORB Shot: A successful strike on the upper post or any contact with the reactor strings and no disc fall. Only 1 point awarded
Lucky 3-Point Shot: Hitting the ORB causing only one disc to fall (high value play).
Skilled 2 Putt: Targeting a specific disc and knocking only that one loose.
Sloppy 2 Putt: Hitting below the Orb post and causing only one disc to fall by luck.
*Sympathy point (1 pt): If you miss all points except for one slop shot then you can take one point for sympathy. Any other hits will omit this opportunity. This rule does not have to be used if you don’t want to.*
Penalties (or No Points) While Putting:
Slop Shots: Hits below the post and makes more than one disc fall (but not all). No points for that throw, but you can continue.
Kill Shot: A reckless impact during bonus putts that causes all remaining discs to fall at once. This wipes out any points earned during that round. If you have remaining putts you can still get one point or so.
***Remember the Safe shot is always the ORB: You won’t be penalized if you hit the upper portion of the Orb. Even if all discs fall to the ground. This is the safest option and it may even give you the lucky 3.
Notes to remember
Note1: Any disc that falls off stays on the ground until the round is over for each player. If the wind knocks it off then you can reset it.
Note 2: LZ (landing zone) will decrease 10 feet each shot over par. 30 ft, 20 ft, 10 ft
Note 3: For a more challenging ring size players can call for a small landing zone for the drive. IE: 20 or 10 foot radius markers for their initial distance drives
Note 4: If you accidentally make a disc fall by moving the measurement rope then it must stay down. Be careful.
Note 5: Putt spot location can be different depending on the skill level amongst players. This option is good for family style players where kids may want to be closer. Ideally they can choose the 10 or 20 foot spot for putting. T-pad can also be adjusted for beginning players as well. Pros can add past the 30 foot marker by purchasing another measurement rope.
Note 6: The Orb is considered the Orb strings and skinny post above the white top piece with a red line as the definitive line of decision. Brushing the Orb strings does count as a hit.
Note 7: Any slop hits over par will not count. Only ORB hits and reactions will give 1-3 points. Any disc that falls will remain down throughout the round. And you don’t get your LZ shot if you go over par.
Note 8: Next player sets their own discs back on the Orb reactor rods during game play after the previous person goes. This is the only fair way to have them set correctly by yourself. Please observe the balance mark on the wind stabilizers hooks.
Note 9: If you hit the Orb on a drive shot then you must finish your round and set the orb back up for the next person. Place the disc firmly against reactor rods ends and latch the wind stabilizer. Make sure to level and balance the disc as best as possible. Good sportsmen like rules here…
Note 10: Any hit slop or not on drives or putts must still land in the landing zone in order to receive points. This prevents hard drives and promotes lob shots.
Note 11: You can reposition the disc once you get in the landing zone. This is done by the throwing player and needs to be reset by the next thrower. Thus throwers set their own discs.
Note 12: If a call is too close to call like where it hit on the Orb advantage goes to the player throwing the discs.
Note 13: Rope measurement penalty: Moving the measurement rope and accidentally knocking off discs while measuring your drive landing spot. Loss of target discs but no penalty towards your points. Any of these discs stay down too.